 , the Inventory Manager Icon. For an explanation
of the different columns, click
here.
, the Inventory Manager Icon. For an explanation
of the different columns, click
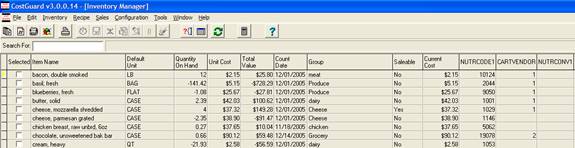
here. Inventory Manager lists all of the Inventory Items that you have entered in CostGuard. From this screen, you can edit, copy, and print various items. You can also export Inventory Items from this screen. Think of Inventory Manager as an overview screen showing the most important information about your ingredients.
To get to Inventory Manager, click Inventory, then Inventory Manager
or click , the Inventory Manager Icon. For an explanation
of the different columns, click
here.
Inventory Manager is the launch pad for a couple of different activities. From here, you can do any of the following:
Filter
Items: CostGuard has a built in Filter, which lets you choose
Inventory items based on specific criteria. To filter, click the
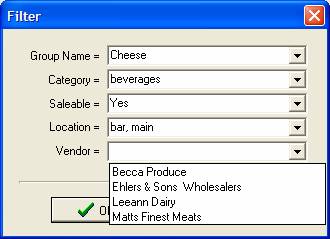
Filter Icon  at the top of the screen.
A popup menu will appear. You can filter by Group Name, Category,
Saleable item, Location, and Vendor. Click the down arrow at the
end of the field, and a list will appear. Using the example below,
you can choose the Vendor and just look at the Inventory Items that they
supply. Click OK after you choose your filter criteria, and only
those Inventory Items will appear on the screen. To clear a filter,
and show all items, click the
at the top of the screen.
A popup menu will appear. You can filter by Group Name, Category,
Saleable item, Location, and Vendor. Click the down arrow at the
end of the field, and a list will appear. Using the example below,
you can choose the Vendor and just look at the Inventory Items that they
supply. Click OK after you choose your filter criteria, and only
those Inventory Items will appear on the screen. To clear a filter,
and show all items, click the  to clear.
You can also right click your mouse button to access the filter popup.
The sample screen shot below shows possibilities for each field: using
multiple filters may return no results.
to clear.
You can also right click your mouse button to access the filter popup.
The sample screen shot below shows possibilities for each field: using
multiple filters may return no results.
Add a
New Item: Click  to add a new Item. If
you want more information on adding items, click
here.
to add a new Item. If
you want more information on adding items, click
here.
Copy Items: for quick and easy way to copy Inventory Items, click here. The Copy command is handy if you need to create related Inventory items, such as shredded cheddar, shredded mozzarella, and shredded parmesan cheese.
Delete
an Item: If you need to delete an Item, then check the box in
the Selected Column. Click the  to delete that
item. Another screen will appear to confirm the delete. If you want
it removed, click yes, otherwise click no to leave it in the Inventory
Manager. If you use this item in a recipe, you will have to delete
it as an ingredient before you can delete it as an item. The Ingredient
Cross Reference Report will show you where you are using it. Run
the report, delete it as an ingredient, then come back, and delete it
from Inventory. For more information on this report, click here.
to delete that
item. Another screen will appear to confirm the delete. If you want
it removed, click yes, otherwise click no to leave it in the Inventory
Manager. If you use this item in a recipe, you will have to delete
it as an ingredient before you can delete it as an item. The Ingredient
Cross Reference Report will show you where you are using it. Run
the report, delete it as an ingredient, then come back, and delete it
from Inventory. For more information on this report, click here.

If you are not using the item in a recipe, but does have historical transactions associated with it, you will see another warning popup. Wait until you have purged the historical data before deleting the item. For more information on purging, click here.
Edit an Item: You can access the Edit Inventory Item from here. For more information on Editing an Inventory Item, click here.
Purchasing
History for an item: Check the box in the Selected Column and click
on  at the bottom. Your purchases and transfers
of this item will appear for your review.
at the bottom. Your purchases and transfers
of this item will appear for your review.
Quick editing screen: Click
 to edit Pars, Minimum Order, Reorder Information,
PLU, and Nutritional Information for your Inventory Items.
to edit Pars, Minimum Order, Reorder Information,
PLU, and Nutritional Information for your Inventory Items.
All: Click on the  button, and every Inventory Item currently on the screen
will be checked. If you have a filter on, then clicking All will
just check those items. You can use the All button as a shortcut
for printing. If you have clicked the All button, it will change
to a
button, and every Inventory Item currently on the screen
will be checked. If you have a filter on, then clicking All will
just check those items. You can use the All button as a shortcut
for printing. If you have clicked the All button, it will change
to a  button to clear the checks.
Print Items: To create a printed recap
of an Inventory Item, check the box (or boxes) in the Selected column
and click the  button. A detail sheet on the
selected item(s) will appear. Click the Printer Icon on the top
row to print it. Click close when it is finished printing.
If you want a sheet for all of your Inventory Items, click All, and then
Print and then the Printer Icon, and you will have a detail sheet on every
item in your Inventory. The same information is available in report form
in the Inventory Directory Report. For more information on the Report,
click here. Send to reports inv box 1 inventory reports.
button. A detail sheet on the
selected item(s) will appear. Click the Printer Icon on the top
row to print it. Click close when it is finished printing.
If you want a sheet for all of your Inventory Items, click All, and then
Print and then the Printer Icon, and you will have a detail sheet on every
item in your Inventory. The same information is available in report form
in the Inventory Directory Report. For more information on the Report,
click here. Send to reports inv box 1 inventory reports.
Export: When you click the  button, you can export Inventory Items. CostGuard
will save them as a text file. You can then open the file in a spreadsheet
program or a word processing program. To export, optionally set
a filter to select the items; then check the box to the left of items
you want to export. Click export. A save item popup will appear.
Type in a name and save the file. You can now start the other program
and open the file within it.
button, you can export Inventory Items. CostGuard
will save them as a text file. You can then open the file in a spreadsheet
program or a word processing program. To export, optionally set
a filter to select the items; then check the box to the left of items
you want to export. Click export. A save item popup will appear.
Type in a name and save the file. You can now start the other program
and open the file within it.
Vendor Transport: Click  to access the optional Vendor Transport interface.
You can use this to import your Inventory Items from an electronic order
guide from your Vendors. For more information on Vendor Transport,
click here.
to access the optional Vendor Transport interface.
You can use this to import your Inventory Items from an electronic order
guide from your Vendors. For more information on Vendor Transport,
click here.
CG-XL: If you have a spreadsheet with
Inventory Items that you would like to import to CostGuard, click the
 button to access the optional import wizard.
You can import the items from that popup. For more information on
the CG-XL, click here.
button to access the optional import wizard.
You can import the items from that popup. For more information on
the CG-XL, click here.
To continue with the Tutorial, click here.