Tips
Since nutrient levels are calculated in a lab, Food Scientists used weight in grams for measuring how much protein, fat, carbohydrates, vitamins, and minerals are in an ingredient. All nutritional databases are based on weight of the ingredient. You may need to convert your volume and count ingredients to a weight measure for the Label to work. You can add a weight unit on the Unit Tab in the Inventory Module. For more information on how to find the weight/volume relationship on any food item, click here.
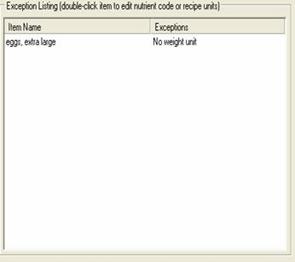
This tab creates the Nutrition Label. If you have entered all of the nutrients, then the Label is ready. You may click on this tab and see the following screen. The Exception Report below will show Inventory items missing data. You need to fix all exceptions for the label to be accurate.
1. Use your cursor and highlight the first exception item. Double click it. The following screen will appear. This screen lets you edit nutrient codes and recipe units instead of going back to Inventory.
Since the process is the same as earlier screens, click here for information on Nutrient Codes, and click here for information on entering weight units on the Unit Tab. Make the necessary changes and click close when finished to save.
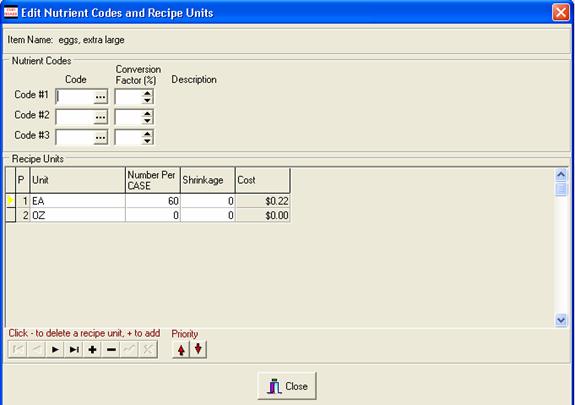
2. Once you click close, the ingredient will disappear from the exception report. Highlight the next exception and double click. Repeat step one until all exceptions are fixed.
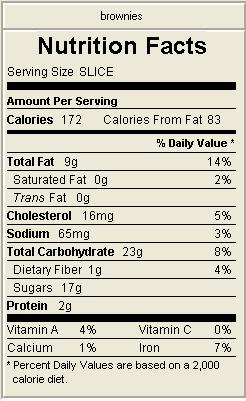
3. When all of the exceptions are fixed, the label is accurate.
If the item meets Federal standards for “Low” and “Free” labeling, the applicable categories will be listed on the Nutrition Tab. “Low Fat” and “Fat-Free” are examples of what may appear. If you would like more information on the specific guidelines and standards, visit the Food and Drug Administration (FDA) at http://www.cfsan.fda.gov/~dms/foodlab.html.
4. From this tab, once the label is finished, you can do the following:
![]()
Recalculate: Click this button to recalculate the label at any time. Handy if you delete, add, or change an ingredient to a recipe.
Export: Click this button to export the nutritional details for use in another program. A pop-up menu will appear. Give the file a name and click save. Use the recipe name as the file name so that it will be easy to find. You can use the file in another nutritional program, or give to your RD for further analysis.
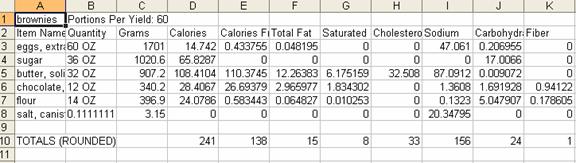
View Details: Click this button, and CostGuard will send the Nutrients to a spreadsheet program (if installed on the computer) for further review. A small sample view of the spreadsheet is below. Once it transfers to the spreadsheet, you can edit, print, or add details, however, they will not import back to CostGuard.
Browse USDA Data: When you click this button, the USDA database will appear.
Save Label as Image: Click this button to save the label as a JPEG image for editing in a graphics program. If you need to print Nutrition Labels on self-stick label paper, use this option to move the label to a printing program. If you want to insert the label in the Method section, click the Method tab, and click Insert Nutrition Label.
5.
To print the label, click the ![]() icon.
When finished printing, click close. To save the information, click
the Main Tab and then close to save your updated Nutritional information.
icon.
When finished printing, click close. To save the information, click
the Main Tab and then close to save your updated Nutritional information.
Continue  Quick Tour
Continue with the Recipe Section of the Tutorial.
Continue with the Optional Modules section of the Tutorial.