Tips
Use the User defined and Comment section to add additional information on this vendor. Some suggestions include order and delivery days in your area, cut-off and will call times and additional phone numbers.
You can quickly add Vendors to CostGuard. If this is the first time you have used CostGuard, setup the Vendors before entering your Inventory Items. To enter a Vendor, collect the following information and have it handy, as you will need it to create their file: phone numbers and other contact information, address, sales representative name, your customer number, and payment terms. Most of this information should be on a recent invoice, or a business card from the company.
If you are in a hurry to use the Inventory Manager, then enter in the Vendor Name, you can fill in the rest of the information later. Don’t forget to Save each Vendor
To enter in the Vendors
1. Click Inventory
2. Click Setup
3. Click Vendors
4.
Click the ![]() at the bottom of the window
at the bottom of the window
5. Using the Tab key or mouse to move, type in Company Name, Sales Rep Name for Contact, Web site, Email, Phone, fax, and Cell. Type in the Address.
If you do not have the information, leave the field blank. You can come back later and enter it.
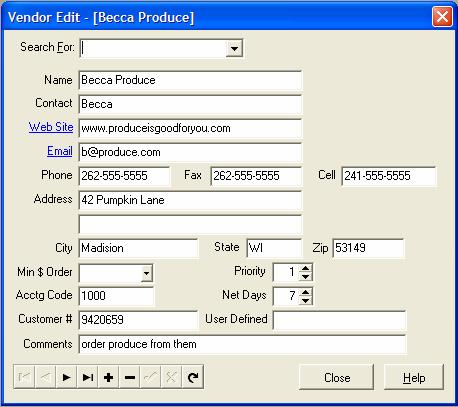
6. Type in Minimum order amount for delivery
7. For Priority: Rank this vendor.
#1 is your primary vendor, or who you order the most from. #2 are secondary or specialty vendors. If you order an equal amount from different sources, use the same priority for them.
8. Type in your accounting code for this vendor. The Accounting code is your code number for this vendor in your accounting system. This is only required if you are using the Accounting Interface.
If you do not have the optional Accounting Interface, you can still enter it as a cross reference. For more information on the Accounting Interface, click here.
9. Enter in your net days. If you pay on delivery, enter zero. Otherwise, 7 for weekly, 14 for two weeks, and 30 for 30 days and 10 days End of Month.
10. Type in your customer number, this is the number that this vendor has assigned to your account.
11. Use the User Defined and Comment Field to enter in any other information.
You can use these fields for anything.
12.
When finished typing in all of the information, click on the ![]() button to save the vendor information.
button to save the vendor information.
13.
Use the ![]() and
and ![]() to add more
vendors as needed.
to add more
vendors as needed.
14. When finished, click Close to end.
15. You can print out a list of all of your Vendors and their contact information. Click Inventory, click Reports, and click the button before Vendor List.
Contact information for all of your Vendors will print. Keep a hard copy of this list handy, so you can contact them without opening the program. Later, after you enter the Inventory Items that you buy from them, you can print out an Order Guide. For more information on List Reports, click here. For more information on how to print an Order Guide, click here.
16.
To delete a Vendor, move your cursor so that the ![]() is to the left of the Vendor name. Click the
is to the left of the Vendor name. Click the ![]() to delete. A popup will appear to confirm.
Click Yes to Delete, click No to cancel.
to delete. A popup will appear to confirm.
Click Yes to Delete, click No to cancel.
If you accidentally delete a Vendor, you will need to re-enter all of the information. .
Continue regular path
Click here to return to Inventory.