Tips
Did you get everything that you ordered? If you used CostGuard to create the order, then click the PO field in Receipts. Choose the order for this delivery. CostGuard will then fill the screen with all of the items that you ordered. You can compare the quantity ordered with the quantities on the Receipt. For more information on orders, click here.
After the delivery truck from the Vendor pulls away, you will have an invoice with valuable information for CostGuard. Entering information from the invoice to CostGuard updates the on-hand and costing data for those Inventory Items.
Why enter this information? CostGuard uses it to update the cost information for each Inventory Item. It updates the on-hand levels for reports, requisitions, and usage. And, since CostGuard calculates Inventory levels based on Receipts, you do not have to go back and adjust your Orders for products that did not come in.
CostGuard has two different ways to enter a receipt. You can type the information in, or use the optional Vendor Transport. Since Receipts are an important internal component of the program, use one method per invoice. Once you save a Receit, you cannot go back in and edit it.
If you have an accounting program such as QuickBooks or Peachtree, then you do not have to enter the invoice in both programs. CostGuard has an optional Accounting Interface that transfers information to your bookkeeping program. You enter the invoice in CostGuard as a Receipt, and then transfer to the Accounting Program. For more information on the Accounting program, click here.
To see how to enter Receipts using VendorTransport, click here.
To enter a receipt manually
1. Click Inventory, click Receipts.
2.
Use the cursor to move the ![]() to the box to the
left of the Vendor. Click Select
to the box to the
left of the Vendor. Click Select
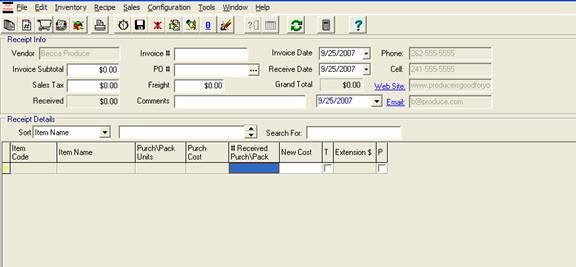
3. A blank Receipt Screen will appear. Enter in the Invoice Number, Invoice Subtotal, Receive Date, Freight Charge, and Sales Tax. If you have any comments on the invoice, enter it in the comment line
To track receipts, CostGuard needs a unique invoice number for delivery.
4.
Enter in the Invoice date. You can type in the date or click
the ![]() at the end of the date line.
at the end of the date line.
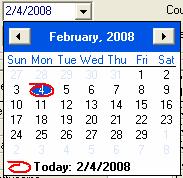
You should enter in the date that the
goods were received. The date popup will appear. Today’s date
is blue with a red circle around it. If you want today, then click
the circle to enter it. To choose another date in this month, then
move your cursor to that date and click on it. To go to a previous
month, click ![]() button. Keep clicking this button
until you get to the month that you want. Today’s date, or if you highlighted
another date will still be blue in that previous month. Find the
date that you want and click on it. You can use the
button. Keep clicking this button
until you get to the month that you want. Today’s date, or if you highlighted
another date will still be blue in that previous month. Find the
date that you want and click on it. You can use the ![]() to move to months in the future.
to move to months in the future.
5.
You have three options to fill the Receipt Field. You can
use the Fill Icon, click the PO #, or use the ![]() button
to add the Inventory Items.
button
to add the Inventory Items.
You can use any combination of the three to add your items.
6.
To use the ![]() icon, click it. The Bid activation
popup will appear.
icon, click it. The Bid activation
popup will appear.
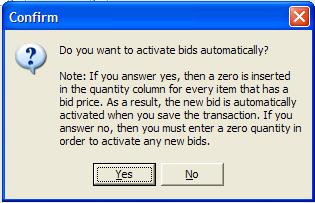
Click yes to save the Bid pricing. If you click no, then you will need to type in a quantity for the new prices to hold. Use it if you have a bid on file from this vendor, and the most recent bid prices will appear. If you need to add prices in the system to reflect current costs – such as a caterer updating prices for an event, the fill icon will let you enter prices without entering a quantity purchased – a “dummy invoice”. This feature is handy if you have Inventory Items on the shelves, as CostGuard will not cancel out a previously paid cost. For more information on Bids, click here.
7.
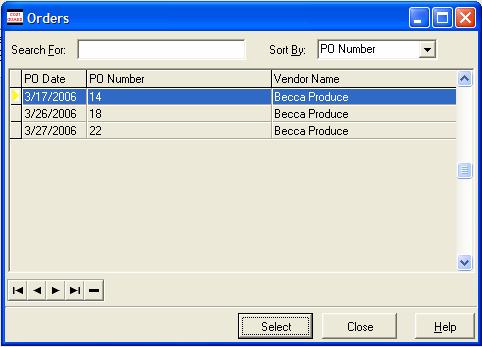
To use the PO#, click the ![]() at the end of the
field. A list of Orders from this Vendor will appear. Use
your mouse to move the
at the end of the
field. A list of Orders from this Vendor will appear. Use
your mouse to move the ![]() left of the Order associated
with this Receipt. Click Select.
left of the Order associated
with this Receipt. Click Select.
The screen will fill with the Items you ordered, but the quantity will be blank.
8.
You can enter Inventory items with the ![]() button.
A list of Inventory Items from this Vendor will appear. Use the
Search field, or the scroll bar to find the Inventory Item you wish to
choose. Make sure the
button.
A list of Inventory Items from this Vendor will appear. Use the
Search field, or the scroll bar to find the Inventory Item you wish to
choose. Make sure the ![]() is to the left of the
Inventory Item. Click Select. The Item code for this Vendor
will appear. Type in the code and click OK. If you do not
have the code, then leave it blank. GostGuard has now added the
Inventory Item to the Receipt Item Window.
is to the left of the
Inventory Item. Click Select. The Item code for this Vendor
will appear. Type in the code and click OK. If you do not
have the code, then leave it blank. GostGuard has now added the
Inventory Item to the Receipt Item Window.
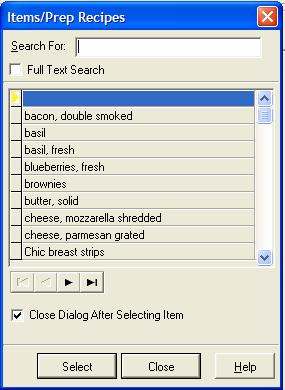
Once you have added an Inventory Item to this list, it will be available for all other transactions. If you are entering more than one Inventory Item this way, uncheck the box labeled "Close Dialog After Selecting Item,” and after the code window appears, you will come back to the smaller Inventory Item Screen. If you use the Search function, as you type in letters, the cursor will move to the first item that matches the letters. You can use the Search box, the scroll bar, or the directional arrows to find your Inventory Items. When you are finished with selecting Items, click close. If you used the CG-XL to import Inventory Items, or another bulk import method, you can use the Receipt Screen to quickly attach the Inventory Items to a Vendor.
9. With the Invoice handy, start entering in the # Received Purch\Pack and New Cost for each Inventory Item listed. Don’t forget the decimal points, and check to see if an Item’s price has changed from Bid to Receipt.
If the Vendor breaks cases, and does not upcharge for the unit, then enter the Purchased Items as such 3\2. If you have a special price item, such as a “Two for One” deal, and you do not want the discounted price to be the basis for your costs, then click the box in the T (for temporary) column as it will keep the cost at your previous levels. For more information on common Receipt issues, click here.
10. To enter in a quantity, use your mouse to move to the Quantity column. Type in the Default unit first followed by the Other Unit.
Notice that both the Purch\Pack Units are listed. Back when you created each Inventory item, on the Unit Tab, you chose either the Purch Unit or Pack Unit as the default Physical Count Unit. The Default unit will be in all CAPS, while the other unit will be in lower case. Type in the Default Unit first followed by a slash and then the other unit. Looking at the example below, for Caesar Dressing the Default Unit is CASE while the second unit is gal. If you received 2 cases and 2 gallons of Caesar Dressing on the shelf, you would enter 2/2 for the receipt. If you received 3 gallons of Caesar Dressing, you would enter 0/3. If you found 3 cases of Caesar Dressing, then enter 3 or 3/0 as you prefer. For Receipts, you can enter the quantities in as a decimal to match your Vendor’s invoices. For more information on the Unit Tab, click here.
11.
If you need to delete an Inventory Item from the list, click on
the ![]() to delete the item from the screen. This simply
removes the item from this screen, but doesn’t remove it from the vendor.
to delete the item from the screen. This simply
removes the item from this screen, but doesn’t remove it from the vendor.
12.
If you are called away while entering in invoices, click on the
![]() to Suspend the Receipt. When you come back,
Click on Inventory, Click Receipts, and a reminder to finish the Suspended
Receipt will appear.
to Suspend the Receipt. When you come back,
Click on Inventory, Click Receipts, and a reminder to finish the Suspended
Receipt will appear.
Suspending an Invoice merely holds it. CostGuard does not enter the quantities and costs until you save the Receipt. Remember, once you Save a Receipt, you cannot change it. It is better to suspend the receipt until it is reviewed or double checked. You may set Suspend and Saving Rights based on users; for more information, click here.
13. You can sort the information on the screen. Click the down arrow at the end of the sort field.
You can sort by Item Name, Item Code, Group Name, Group Code, or As Entered. Use the As Entered feature to make sure that you entered all of the items on the receipt.
14.
To Print a Receipt, click on the ![]() icon.
The Print Preview will appear on the Screen. Click on the
icon.
The Print Preview will appear on the Screen. Click on the ![]() to send it to the Printer.
to send it to the Printer.
15. When you are finished entering in the Inventory Items, check to make sure that the totals match. The amount in the Received field should equal Invoice Subtotal plus Tax and Freight. If the totals do not match, then there is an error somewhere that you need to corrected.
If the Receipt and the Invoice are relatively
short, it might just be faster to go line by line. Have another
person read off the information off the Invoice while you check the screen.
For multi-page invoices, if there is a page total on each page, you can
use the Page reconciliation feature. Start by checking the P box
next to the last item on each invoice page. Click Page total ![]() , and a total of the items between the P’s will appear.
It the two numbers match then the problem is on another page. Keep
going page by page until you find the error. If you cannot find
it in a reasonable amount of time, suspend the Receipt with the
, and a total of the items between the P’s will appear.
It the two numbers match then the problem is on another page. Keep
going page by page until you find the error. If you cannot find
it in a reasonable amount of time, suspend the Receipt with the ![]() icon. It is better to suspend a Receipt and find
the mistake later, rather than saving an incorrect invoice that will need
to be documented and corrected for the accounting trail.
icon. It is better to suspend a Receipt and find
the mistake later, rather than saving an incorrect invoice that will need
to be documented and corrected for the accounting trail.

16.
When you are finished with a Receipt, click ![]() to
save the Receipt. CostGuard will ask you if you wish to continue
adding Receipts in, and if you click yes, the Vendor list will appear,
and you will start over again. Click no, and you will exit from
this part of the program.
to
save the Receipt. CostGuard will ask you if you wish to continue
adding Receipts in, and if you click yes, the Vendor list will appear,
and you will start over again. Click no, and you will exit from
this part of the program.
If you would like to use the Accounting program to transfer the Invoice, click here.
For more information on common Receipt issues, click here.
To see how to enter Receipts using VendorTransport, click here.
Continue  Quick Tour
Continue regular path.