Tips
Wait until after you make the item before you use the Prep Build Command. If you Prep Build first, and then neglect to make the recipe outside of a new physical count, there is no way of readjusting your inventory levels. This is one command you need to leave for the end of the day, but the best part - you can load multiple recipes and build once.
Normally, recipes made and served right away to the customers are called serving recipes. When you download the sales data, it will subtract out the ingredients from Inventory. Recipes that do not have a matching sale, such as Prep Recipes, need building to deplete Inventory.
Prep Recipes are batch recipes that you make in large quantities such as soups, stews, or lasagnas. When you make a prep recipe you are using ingredients that are in CostGuard’s Inventory Module. After you make the recipe, CostGuard needs to know what you used so it can subtract the ingredients quantities from inventory. Prep Build is the command that does that for you.
Why do you need to use this command? A physical count entered into CostGuard will catch that the Inventory Item is now at a lower level then before. Since Prep Recipes generally do not have a direct matching sale, the ingredients will show up as a variance or a difference between actual and ideal usage. Another issue may arise with delays between a count and ordering. Prep Build subtracts on the day you do it, while a physical count may be a day or two later. Someone else using CostGuard for requisitions or ordering during that lag time will not know the Inventory items are not on the shelf as CostGuard indicated.
CostGuard’s Inventory Module generates several Reports that may be affected by Prep Builds. When you run the Prep Build command, the built prep recipes are treated like receipts, so they are in the “Actual” usage reports. The individual ingredients are listed in the “Ideal” usage Reports. Using the Prep Build command, instead of simply making the recipes and adjusting the Inventory, helps to keep the Reports accurate and up-to-date. For more information on Inventory Reports, click here.
Some companies require perpetual or up-to-moment accurate counts of each individual item, inventories of all items. If this applies to your establishment, Prep Build is the only way to account for the differences in Inventory for your Prep Recipe ingredients.
Just remember CostGuard depletes prep recipes as whole units. For example, if you build a lasagna recipe, and one ingredient is a prep recipe for marinara sauce, then Prep Build will subtract out Marinara Sauce, not the tomato products and the spices that make up the sauce. If you want to account for the tomato products, then change the marinara sauce to a serving recipe within the Lasagna recipe. When you make the Marinara Sauce, the Prep Build command will deplete the tomato products.
Prep Build is different from the Prep Tab in Recipes. The Prep Tab assigns a location to your Recipe for counting Inventory Purposes. Use Prep Tab to count the Marinara Sauce, use Prep Build to subtract the tomato products from the storeroom shelves and ‘build’ inventory levels of the Marinara Sauce. For more information on locations and Prep Tab click here.
To use Prep Build
1.
Create a New Recipe. Use the mouse or arrow to move the cursor
to the type field. Click the ![]() button to show the
recipe types. Highlight Prep Build and hit enter.
button to show the
recipe types. Highlight Prep Build and hit enter.
If you need to run Prep Build on a daily basis, create a generic recipe called “Daily Prep” and add all of your Prep Recipes as Ingredients. You will need to open the recipe and change the quantities each day before running Prep Build.
2. Click on the Ingredient Tab. Add the Prep Recipe(s) that you need to build as an ingredient. If needed, use the Qty and Unit field to change the yield.
Only Prep Recipes will appear. If you need more information on how to add ingredients to a recipe, click here.
3.
Click on the Main Tab again. Click the ![]() button
on the bottom right side.
button
on the bottom right side.
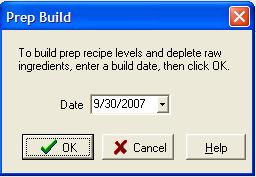
4.
The first pop-up screen will appear. Confirm the build by
clicking ok. If you need to change the date, click the ![]() button to change the date.
button to change the date.
If you wish to cancel the build, now is your last chance to click cancel. Once you click OK, the build will start.
5. The Build will start. A blue status bar is on the lower left corner showing how much time is left, and the lower right corner will show the ingredients as they are depleted.
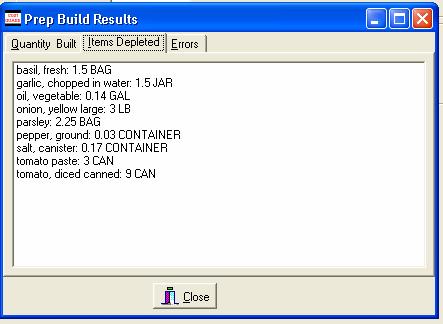
6. The final Results Screen will appear. Quantity Built shows the total quantity of each item made. Items Depleted gives a detailed explanation of what was subtracted from Inventory, and the Error screen will show any problems
Continue regular path