Tips
You must enter the Vendors into CostGuard before you can use this method. To create Vendors, click here.
The Order by Vendor function lets you choose the Vendor first, then fill the order with Inventory Items that you usually purchase from them. To make the most of the Order by Vendor, make sure that your Inventory Items have been set up with order information. Make sure that you have accurate counts of your Inventory in CostGuard. Make sure you have entered any Bids.
Finally, check that your invoices were entered into the program.
While it may seem like time consuming to enter this information, your reward is quick, accurate orders.
1. Click Inventory, click Orders, click Order by Vendor.
2.
The Vendor popup will appear. Use the scroll bar or the mouse
to move the ![]() to the box to the left of the Vendor
you wish to order from. Click select.
to the box to the left of the Vendor
you wish to order from. Click select.
Since this feature orders by Vendor, you will work with one Vendor at a time. Later, you can come back to this screen and select another Vendor and create their order.

3. The Order Screen will appear, with the Vendor Information included. If you wish to add any additional information to the Top window – Order Information, you can tab or use the mouse to enter it.
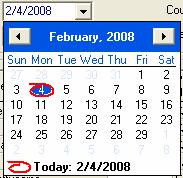
You can change the date, the purchase
order number, and add a comment to the screen. To change the date, click
the down arrow next to the date field. The date popup will appear.
Today’s date is blue with a red circle around it. If you want today,
then click the circle to enter it. To choose another date in this
month, then move your cursor to that date and click on it. To go
to a previous month, click ![]() button. Keep clicking
this button until you get to the month that you want. Today’s date, or
if you highlighted another date will still be blue in that previous month.
Find the date that you want and click on it. You can use the
button. Keep clicking
this button until you get to the month that you want. Today’s date, or
if you highlighted another date will still be blue in that previous month.
Find the date that you want and click on it. You can use the ![]() to move to months in the future.
to move to months in the future.
4. The Order Detail section is blank. CostGuard has two different ways to fill the screen. You can select each Inventory Item or you can use the fill command.
The Fill command quickly adds all of the Inventory Items that you purchase from this Vendor to the screen. For more information on the Fill Command, click here.
5.
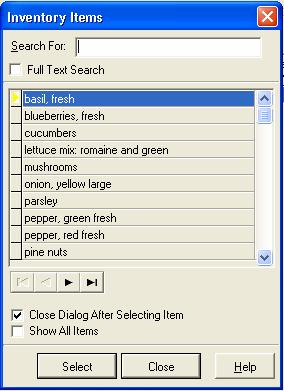
If you want to select Inventory Items for this order, click the
![]() icon to bring up a list of Inventory Items associated
with this Vendor. Use the Scroll bar, or Search function to find
the Inventory Item you wish to order. Make sure that the
icon to bring up a list of Inventory Items associated
with this Vendor. Use the Scroll bar, or Search function to find
the Inventory Item you wish to order. Make sure that the ![]() is to the left of the item. Click select.
is to the left of the item. Click select.
If you want to see all of your Inventory Items, click the box labeled Show All Items. To add Inventory Items faster, unclick the Close Dialog After Selecting Item box, which will let you quickly add Inventory Items to the list. Click the box before Full Text Search to match partial words or letters for faster searching. If you select an item that you have not ordered from this Vendor before, CostGuard will ask for their Item Code. Type it in. Once you add an Inventory Item to a Vendor, it will save, and this item is now associated with this Vendor.
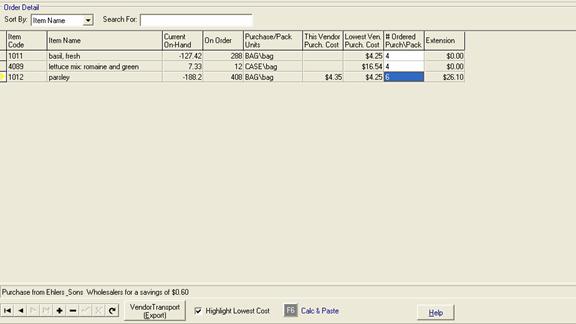
6. The Inventory item that you selected is now on the screen. CostGuard will show the current on-hand and the Purch Unit cost of the Inventory Item from this Vendor. Type in the number of Purch Unit you wish to buy.
At the bottom of the screen an alert will appear if another Vendor has submitted a lower price. When you type in the Quantity, the total savings from that other Vendor will appear. Watch your alerts, as they will show you who has the lowest price that week. See the example below, where another Vendor has a better price on Parsley this week.
7.
To delete an Inventory Item that you do not wish to order, click
on the ![]() button.
button.
This will only remove the item from the order; don’t worry, you aren’t deleting or changing the actual inventory item when you do this.
8.
To add additional Inventory Items, keep clicking the ![]() button. Make sure that you type in the Quantities
needed.
button. Make sure that you type in the Quantities
needed.
Back when you created each Inventory item, on the Unit Tab, you chose either the Purch Unit or Pack Unit as the default Physical Count Unit. The Default unit will be in all CAPS, while the other unit will be in lower case. Type in the Default Unit first followed by a slash and then the other unit. Looking at the example above, for lettuce mix the Default Unit is CASE while the second unit is bag. If you want to order 3 cases and 2 bags of Lettuce mix, you would enter 3/2 for the order. If you only want 3 bags of Lettuce mix, you would enter 0/3. If you want 3 cases of Lettuce mix, then enter 3 or 3/0 as you prefer. For more information on the Unit Tab, click here.
9. You can sort the information on the screen. Click the down arrow at the end of the Sort By field. Use this to make sure you have entered everything you need.
You can sort by Item Name, Item Code, or As Entered. Use As Entered if you are combining lists from several people.
10. When you have finished adding all of the items, double check the quantities and the pricing alerts. If you are finished creating the order, CostGuard has other options for you.
To Print an Order, click on the ![]() icon. The Print Preview will appear on the
Screen. Click on the
icon. The Print Preview will appear on the
Screen. Click on the ![]() to send it to the Printer.
You can suspend the Order by clicking the
to send it to the Printer.
You can suspend the Order by clicking the ![]() icon.
Suspending an order “holds” it, for review before it is sent. You
can save the order by clicking the
icon.
Suspending an order “holds” it, for review before it is sent. You
can save the order by clicking the ![]() icon. Later,
if needed, you can go back and edit or delete the order. For more
information, click here.
icon. Later,
if needed, you can go back and edit or delete the order. For more
information, click here.
Continue regular path
To return to the main Order Screen and choose another Ordering method, click here.
To explore the Fill command in Order by Vendor, click here.
To go to VendorTransport and learn how you send your Order electronically, click here.