 VendorTransport: Importing Order Guides VendorTransport: Importing Order Guides
 VendorTransport has two different places where you can import information from your wholesalers. You can import Order Guides and you can import receipts or invoices. You can export orders to their computer system.
When you import information from the wholesaler to CostGuard, it is available in all of the different parts of the program. The largest import, in terms of file size, should be your Order Guide. This section shows how to import the Order Guide. When you import your Order Guide, you have the option to change the pricing on the Inventory Items.
To Import an Order Guide
Order Guides are lists of items and their prices from a Vendor. Most kitchens need to import an order guide, and then update it on a regular basis to reflect the price changes. Once CostGuard imports an Order Guide, the pricing information is updated automatically in subsequent imports if you enable that option. You can use this feature to quickly add inventory to the program. It is also used as an electronic bid price.
Before you can import an order guide, open your Vendor’s ordering program, and follow their directions to save or export it to a file on your computer. If you receive order guide updates from email, save the update file. If you are receiving and importing daily Order Guides, name the files with today’s date. Close or minimize the Vendor’s program based on their recommendation.
1. Click Inventory, Click Inventory Manager
Click the  button.
2. The Vendor Transport (Import Item) popup will appear. Click Select and find your import file from the Vendor.
Another popup will appear showing your files. Click on the down arrow at the end of the Look in field to move between directories. You may need to click the down arrow at the end of File Types and switch to “all files” to list all files in the directory. When you find the file, highlight it, and click Open. You will return to the main Import screen.
3.
Use your mouse to move to the Import Format. Click the  button. Find your vendor’s format; highlight it
and hit enter. Move your mouse to the Vendor Field. Click
the button, and find the Vendor. Highlight
it and hit enter.
button. Find your vendor’s format; highlight it
and hit enter. Move your mouse to the Vendor Field. Click
the button, and find the Vendor. Highlight
it and hit enter.
If we have an interface for this vendor, CG will translate their order guide for you. Some distributors use unique terms in their program, which we will pick up. If your Vendor is not listed here, please contact us, so we can determine which format you need to use
4.
If the items that you purchase from this Vendor are stored in one
location, such as a Dairy Vendor with your milk, butter, and cheese deliveries,
then move your cursor to the Location field. Click the button, and find the Location such as Walk-in Refrigerator.
Highlight it and hit enter.
If you are importing an order guide from a broadline Vendor, you may want to edit the Inventory Items after the import to add the Locations.
5.
Click the  button. CostGuard will provide
a preview of the import.
button. CostGuard will provide
a preview of the import.
All of the items on the order guide are in the middle window. Using the cursor or the scroll bar, go through the list. Click the box to the left of the items that you want to import into CostGuard.
6. If nothing happens, or you have an error message, double check the Import Format to see if it matches your file.
You can also try importing the file as CostGuard text or as an ASCII file. If the order guide is a spreadsheet, then use the CG-XL feature. For more information, click here.
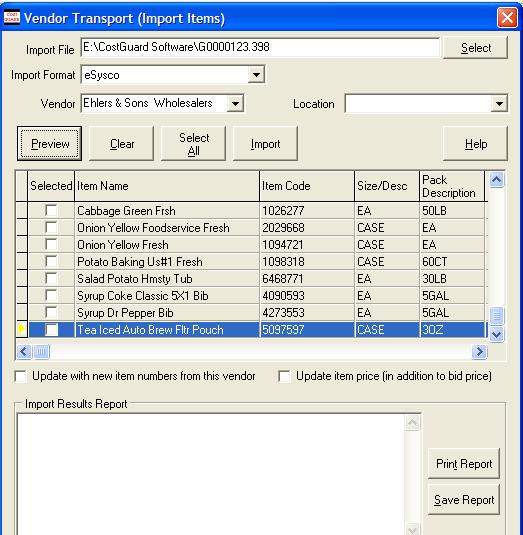
7. Before the final Import, you can check the boxes at the bottom of the window. You can check the box labeled “Update with new item numbers from this Vendor” and “Update Item Price (in addition to bid price)”
“Update with new item numbers from this Vendor” will add all of the Vendor item codes to Inventory Item. Check this feature, as when you import future order guides, CostGuard will look for the item number. This feature will let you change the name of the Item in CostGuard to reflect what you call it, matching your Inventory Naming scheme. For example, matching by Item number means that you can change “Tea Iced Auto Brew Fltr Pouch” to “Ice Tea, Brew Pouch” in CostGuard and future updates will capture the price changes.
8. Click the second box “Update Item Price” means that this import will save the Item pricing for use in Bids and Orders screens.
Click this box, and import your Order Guide on a weekly basis to capture your bids electronically.
9.
Click the  button to finish the Import.
Depending on how many items you have, it may take a few minutes.
button to finish the Import.
Depending on how many items you have, it may take a few minutes.
When the Import is finished, you can print the
Report by clicking the  button. You can save it
by clicking the
button. You can save it
by clicking the  button.
10. If there were problems with the Import, they will be listed in the bottom window. Fix the errors. You can then import the affected items again.
11. After importing the Inventory items, you may want to edit them. To edit an item, click Inventory Manager and find the item. Click Edit. The Inventory Item Main Tab will appear.
From this screen, you can edit or add information to the Inventory Item. You can change the name, location, prep station, units, and add other Vendors. For more information on how to edit an Inventory Item, click here.
If you would like to return to the Enter a New Inventory Item, click here.
If you would like to continue in the main tutorial, click here.
If you would like to go to the next section in Vendor Transport, importing Receipts, click here.
If you would like to return to the Bid section, click here.