 Location Setup Location Setup
 Locations are where you keep your Inventory. CostGuard uses the Location field to generate reports based on where you store your inventory so that you can quickly count items each week.
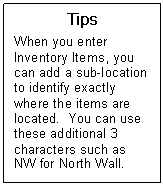
Your location field has ten characters, so try to use a combination of letters that make sense yet are readily identifiable. As a suggestion, use Frzr,walk (walkin freezer), and Frzr,reac (reachin freezer) as an example. Later, when you create an Inventory Item, you can enter a sub-location or three more characters that further define the spot.
To Setup the locations
1. Click Inventory, Click Setup, Click Locations
The location pop-up will appear.
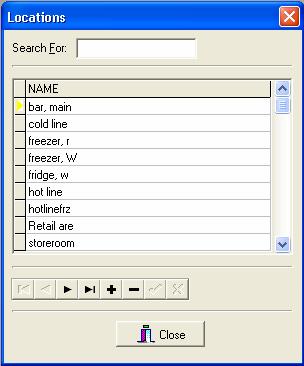
2.
To add a location, click the  at the
bottom.
at the
bottom.
3.
On the blank line next to  type in the location
name
type in the location
name
4.
Click the  sign to save the location.
5.
Keep using the and to
enter as many locations as needed.
6. To
delete a Location, move your cursor so that the  is
to the left of the Location name. Click the
is
to the left of the Location name. Click the  to
delete. A popup will appear to confirm. Click Yes to Delete,
click No to cancel.
to
delete. A popup will appear to confirm. Click Yes to Delete,
click No to cancel.
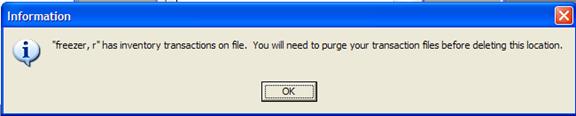
If you accidentally delete a Location, you will need to re-enter it. Because CostGuard uses Locations for Counts, if you try to delete a Location with saved counts, you will see the following popup. You will need to purge your data before you can delete the location. For more information on Purging Data, click here. If you click OK on this popup, it will return you to the Location screen, without deleting.
7. When finished entering Locations, click Close.
8. If you would like to see a list of Locations that you have entered into CostGuard, click Inventory, click Reports, and click the button before Names List. Click Next, then Print to Print the List.
This Report shows all of the Names you have entered into CostGuard. For more information on this Report, click here.
To continue with the Tutorial and go to Prep Stations, click here.