Tips
The fastest way to enter sales data is to create one menu with all of your dishes and saleable items included as ingredients. If you create nightly specials, create a placeholder recipe for each main ingredient, and later use the Comment field on the Sales mix to describe the specials.
CostGuard enters the Sales Data via Menus. Before you can input the data, you need to group the recipes into menus. You will need to go to the Recipe Module to create the menus. There is a review of creating menus below. Within the Sales Module, there is an editing Menu function allowing you to add or delete dishes as needed.
To Create Menus:
1. Click Recipe, Click New Recipe.
2. Use the mouse or the arrows to move to the Name Field. Type in the name of the Menu. A good name for this menu is “Sales Data Entry”.
If you have more than one meal period, you can also create menus named “Sales Data Entry Lunch” and “Sales Data Entry Dinner,” if that is easier for your operation.
3.
Move the cursor to the Type Field. Click the ![]() to display the list of Recipe Types. Use the arrows
or the mouse to highlight Menu. Hit enter.
to display the list of Recipe Types. Use the arrows
or the mouse to highlight Menu. Hit enter.
4. Use the mouse or arrows to move to the Description Field.
5. Since you are using this menu to enter sales details, no information is need for the Yield/Portion and Pricing Fields. Click Ingredients to enter the dishes.
The units will default to ea for the Yield and Portion fields.
6.
Click ![]() to show the Item/Recipe Pop-up Menu.
Use the search function or the scroll bar to find the recipes that you
want. Make sure the
to show the Item/Recipe Pop-up Menu.
Use the search function or the scroll bar to find the recipes that you
want. Make sure the ![]() is to the left of
the item. Click Select.
is to the left of
the item. Click Select.
You can enter the recipes in any order that you wish. If needed, use the Recipe Tree to make sure that the “Sells For” information is correct.
7.
Use the mouse or arrow keys to move to the Qty and Unit Field.
Click the ![]() to display the yield units that you created
earlier. Most establishments will sell 1 portion of the dish.
to display the yield units that you created
earlier. Most establishments will sell 1 portion of the dish.
If you sell items in larger quantities such as trays of lasagna, simply have a serving recipe with a yield of one tray and the corresponding price.
8. Highlight the Unit, and click OK. Now, back on the main screen, the cursor will be in front of the unit. Type in 1 and hit enter.
9. Keep entering in all related recipes. To make the entry faster, unclick the “Close Dialog After Selecting Item” box, and the pop-up box will stay open.
10. When finished entering in the recipes, click the Main Tab, then Click Close to save the Menu.
To Edit an Existing Menu
1. Click Sales, Click Menu.
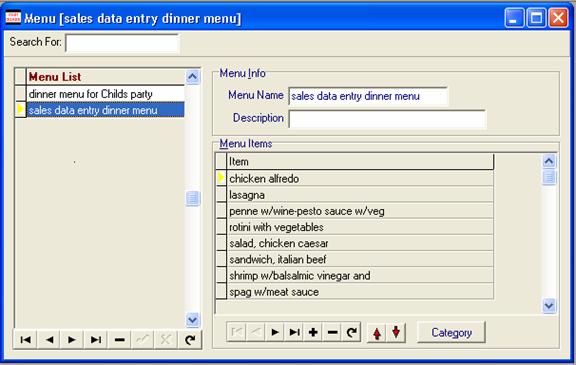
2. On the Left side of the screen are the Menus you have created. The right side of the Screen shows the component items for the selected menu.
3.
Use the Search function or the Scroll bar to find the Menu you
wish to edit. Make sure that the ![]() button is to
the left of the Menu you want.
button is to
the left of the Menu you want.
Move the mouse to the right side of the
screen. You can delete an item by highlighting it with the ![]() and clicking
and clicking ![]() button. You can
add an item by clicking the
button. You can
add an item by clicking the ![]() button, and a new pop-up
menu will appear. This pop-up menu will show only serving recipes
and saleable items. Use the Search or Scroll bar to find the new
recipe, highlight it, and click Select. If you need to make changes
to the portion, yield, or sells for data, exit this screen and make the
changes in the Recipe Module.
button, and a new pop-up
menu will appear. This pop-up menu will show only serving recipes
and saleable items. Use the Search or Scroll bar to find the new
recipe, highlight it, and click Select. If you need to make changes
to the portion, yield, or sells for data, exit this screen and make the
changes in the Recipe Module.
4.
You can use the ![]() button to reorder the menu items
if needed.
button to reorder the menu items
if needed.
When you enter the actual sales data, CostGuard will let you sort the items by name or by PLU number.
5.
When finished editing, click the ![]() button to
save the changes. Click the Red X to close.
button to
save the changes. Click the Red X to close.
Continue regular path