Tips
CostGuard will allow multiple categories for a single recipe. So, a Minestrone Soup Recipe can be categorized as lunch, dinner, appetizer, and soup - giving you the most flexibility for sorting and reports. The first one listed on the Category Tab is what the filter function will look for.
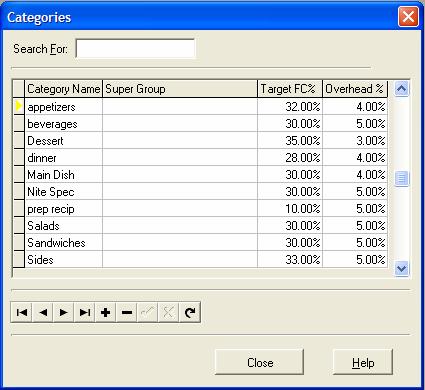
Categories are groups of similar recipes. You can search, sort and print reports based on Categories so that you can track what is important to you. Here is a partial list of the ways you can categorize recipes.
By daypart: breakfast, brunch, lunch, dinner, happy hour, snack
By order of the meal: appetizer, soup, salad, main entrée, dessert
By cookbook order: appetizer, beverages, breads, cakes, cookies, etc.
By type of menu: regular menu, nightly special, catering, banquets, day on a cycle menu
By location: main restaurant, café, catering, and bar
By Ethnicity: French, Chinese, and Italian
By Cuisine Type: Fusion or Traditional
Just remember, it is Category for Recipes: Groups and Super Groups for Inventory Items. Inventory Items can only have one group, while Recipes can have multiple Categories. If you find it easier to use the same names for both the Groups and Categories: that is fine, you will still need to create the Categories for use in Recipes.
1. Click Recipe, click Setup, and click Categories.
2.
Click the ![]() button to add a new Category.
Type in the name.
button to add a new Category.
Type in the name.
3.
Use the mouse to move to the Super Group and click ![]() button to bring up a list of Super Groups. Use
the mouse or the arrows to move to the Super Group that you want.
Make sure that the yellow arrow is to the left of the Super Group.
Click Select.
button to bring up a list of Super Groups. Use
the mouse or the arrows to move to the Super Group that you want.
Make sure that the yellow arrow is to the left of the Super Group.
Click Select.
This allows you to connect the Super Groups in Inventory to the Categories in Recipes. This is only needed if you’re using the Sales module, and you want to select certain sales reports by Super Group. If you do not want to relate any or all Categories to SuperGroups, leave the field blank. For more information on SuperGroups, click here.
4. Use the mouse to move to the Target FC% field. Type in your target food cost for this Category. Hit enter.
CostGuard will allow you to set a different target food cost percentage for each Category of Recipes. Later, when you create the recipes, the first Category listed will determine the target food cost for that dish, and target sales price. You can reorder the Categories in the Recipe section to match your menu mix and customers. For more information on how the percentages are used, click here.
5. Use the mouse to move to the Overhead % field. Type in your overhead percentage for this Category. Hit enter.
Overhead allows you to add in a set percentage based on the Category to cover other expenses. For more information on Overhead, click here.
6.
If you have another Category to enter, click the ![]() button to create a new one. Keep clicking the
button to create a new one. Keep clicking the
![]() until all Categories are created. When finished,
click close.
until all Categories are created. When finished,
click close.
Continue regular path