Tips
Just checking on something? It may be faster to do it from the Inventory Manager Screen.
The Inventory Manager Screen shows all of the Inventory Items that you entered into CostGuard. From this screen, you can check counts, cost information, and sort, filter, or print the items.
The columns are:
Current Item
Column: This column has a ![]() which moves
up and down with the cursor. When you want to do something, such
as edit an Inventory Item, make sure the yellow arrow is to the left of
the item before clicking the button. The arrow tells the program
what item you want to work with.
which moves
up and down with the cursor. When you want to do something, such
as edit an Inventory Item, make sure the yellow arrow is to the left of
the item before clicking the button. The arrow tells the program
what item you want to work with.
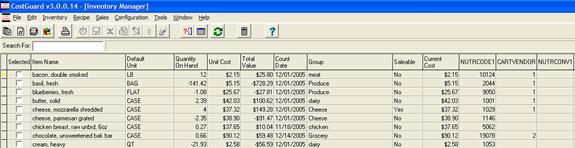
Selected Column: If you want to work with more than one Inventory Item, for example, you would like to print or export all of your cheese products, check the box in this column. This column lets you pick more than one item to analyze.
Item Name: You created this item name when you added the Inventory Item. Inventory Items are listed alphabetically. For suggestions on naming inventory items, click here.
Default Unit: This is the default unit for counting this item. For more information on choosing the unit, click here.
Quantity on Hand: This is the last count that you entered for this Inventory Item. For more information on entering counts, click here.
Unit Cost: This column shows the last price paid for this item.
Total Value: Also known as the extension, this column takes the quantity on hand and multiplies it by the unit cost. It shows the total value of this Inventory Item.
Count Date: Shows the date that you last counted this item
Group: Shows the group that you associated with this Inventory Item
Saleable: If you checked the saleable box when you created this item, it will have a Yes in this column. If not, a No will appear. For more information on Saleable items, click here.
Current Cost: This column shows the Current Cost that you entered on the Main Screen when you created this Inventory Item. It is the “newest cost”.
Nutricode 1- 3: If you have the optional Nutrition Module, these columns show the Nutrition codes that you created. For more information on the Nutrition Module, click here.
Cart Vendor: This column shows the Shopping Cart Vendor Assignment for this item. If the column has a 1, then you assigned it by price. If it has a 2, then you assigned it by Primary Vendor for this item. If it is blank, then left it with the default – price. For more information on shopping cart, click here.
If you want, you can rearrange the columns so the information that you want is where you want it. For more information on rearranging, click here.