Tips
CostGuard handles U.S. Measurements (Sterling) and Metric calculations with ease. You may also use Cans, Counts, Scoops, and Units to describe your Inventory Items. You can create your own Units. For more information on creating a unit, click here.
How many hours do you spend calculating number of ounces in a gallon? Or how many slices should you get from 10 pounds of meat? Or how many cups are in a pound of flour? One of CostGuard’s features is that it will do the math for you, after you fill in the details about Inventory Item. The Unit Tab for New Items is where you tell CostGuard how the product comes to you, how you count it, and how you measure it for recipes. If Units are compatible, such as fluid ounces (floz) to gallons (gal) the math is done automatically. If the Units are different, such as slices from a pound (LB) or cups in a pound, then you will need to give CostGuard some conversion information.
To see examples of how some foodservice items are entered in CostGuard, click here.
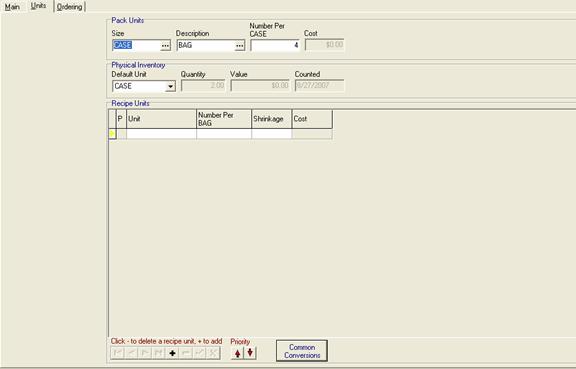
1. Enter in the Pack Units
Remember that you entered in the Purchasing Unit (the big one) on the Main screen. Pack units are smaller units within that Purchasing Unit. For example, Salad Dressing comes in a case (Purchasing Unit) with 4 one-gallon units (Pack Unit) or 1000 packets (Pack Unit). Flour comes in a bag, and the smaller unit is pounds. Pack Units can be the same as your Purchasing Unit, especially for bottles of liquor or for meat items.
2.
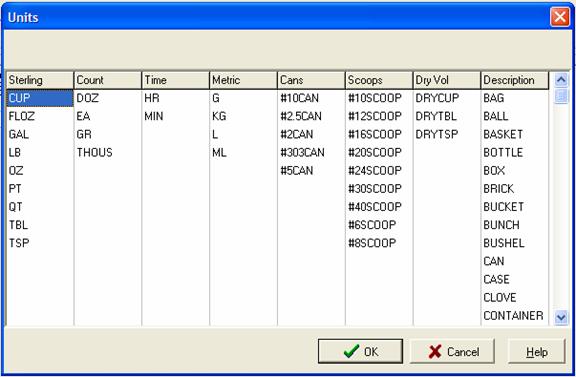
Click on the ![]() to show Units. Use your
mouse to highlight the Pack Unit. Click OK.
to show Units. Use your
mouse to highlight the Pack Unit. Click OK.
The Unit popup will appear. This popup shows all of the different units available in CostGuard. Using Salad Dressing as an example, the Pack Unit is Gal, The Purchasing Unit was Case. For more information on Units, click here. Try to use the detailed descriptions that we have provided you. When you use them, CostGuard will easily convert the units as needed. This way, you do not have to spend time entering in related units.
3.
Click on the ![]() to show Units for the Description.
Click on the Description. Click Ok.
to show Units for the Description.
Click on the Description. Click Ok.
The same popup as before will appear. Description describes the Pack Unit Size. Using the salad dressing example, the Description is Jar. Using the flour example, the Description is pound. Again, in most instances, the Pack Unit Size and Description may be the same. You may specify #10can as the size, but if you’re concerned that people may not understand that unit, you can specify can as the description.
4. Use the arrow or Tab key to get to # per Size/Desc. Type in the Number of Pack Units in the Size/Desc and hit enter.
You created the Size/Desc on the Main Tab. It is the “big” unit that describes how this item is purchased from a Vendor. Using the Salad Dressing, if there are 4 one-gallon jars in a case, then type in 4. For the flour example, there are 10 pounds in this bag of flour.
5. Tab down to the Physical Inventory Box. Go to Default Unit. This is where you choose the Unit that you will track for Inventory purposes. Click on the Down Arrow, and your choices (Purchasing Desc from Main) and (Description from Units) will appear. Click on the one that you are most likely to count in your physical Inventory.
CostGuard wants you to enter the primary count unit, but don’t worry, when you input your physical inventory, you will be able to use both units for maximum flexibility. For example, using the Salad Dressing, when you go to take the physical Inventory, you will have both Cases and Jars in the Storeroom. Because CostGuard will track both units, you can account for both cases and jars without having to figure out complex fractions of cases in your head. There is also a possibility that all of your units will be the same – and that is okay. This is simply where you indicate the most likely countable description. Later in other transactions, the unit you choose will appear in ALL CAPS, while the other unit will be in small letters.
6.
Tab Down to Recipe Units. This is where you will enter in
Units that this Inventory Item normally uses for Recipes. Click
on the ![]() and the Unit Window will appear. Click
on the Recipe Unit. Click on Ok. Tab over to the next field.
The Header will now read # per (Pack Unit Description) that you entered
above. Type in the number of Recipe Units per Pack Unit of this
Item.
and the Unit Window will appear. Click
on the Recipe Unit. Click on Ok. Tab over to the next field.
The Header will now read # per (Pack Unit Description) that you entered
above. Type in the number of Recipe Units per Pack Unit of this
Item.
If a recipe Unit is compatible with the
Purchasing Unit or the Description, then you do not need to add it here:
a timesaver with this program. An example is with the Salad Dressing,
purchased 4 one Gallons to a Case. If you have recipes calling for
a fl oz of Salad Dressings, then you do not need to add that in here,
later in recipes you can use the fl oz with ease. On the other hand,
using the Flour example, some recipes will call for cups of flour.
Since CostGuard cannot calculate the weight/measure without a conversion
factor, you will need to type it in. For this example, since
there are four cups of flour in a pound, type in 4 in the # per LB field.
If you want more information on Scoop Sizes, click
here If you want more information on Weights and Measures in Foodservice,
click here. You can also change the order of
the recipe units by clicking the ![]() buttons up and down.
This is handy if you want to keep the most common recipe unit on top.
buttons up and down.
This is handy if you want to keep the most common recipe unit on top.
7. Tab over to the Shrinkage field and enter in the Shrinkage rate if needed. If an item does not shrink or expand during cooking, then leave it at zero.
If you want more information on how CostGuard
handles As Purchased and Edible Portions (AP/EP) calculations and Shrinkage,
click
here. When finished with the recipe unit line, click
![]() to save.
to save.
8.
If you need to enter in additional recipe units click on ![]() to add them. Fill in the information and click
to add them. Fill in the information and click
![]() to save each one. When finished make sure
you click
to save each one. When finished make sure
you click ![]() after the last one.
after the last one.
After you finish entering the recipe units, notice that certain cost fields have been calculated for you, based on the Cur Cost information on the Main page. Later, when you enter invoices, the cost will automatically update for you each time.
When finished with this section, click on the Ordering Tab.
Continue  Quick Tour
Continue regular path