Tips
For your Inventory Items, have a copy of an invoice with the item handy. Most invoices will have all of the information you need to enter in the item.
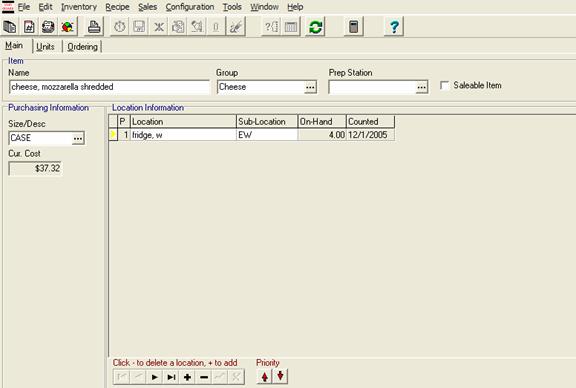
This is where you type in your Inventory items into CostGuard. As you go through this section of the Tutorial, you can click through to explanations of the different sections, and then come back.
Remember that CostGuard’s Inventory Program can track food, liquor, bottled beverages, single serving items, linens, tables, chairs, chemicals, paper products, and just about any item from floor to ceiling in a foodservice operation. You can also create
nventory items for labor costs, taxes,
and other recurring expenses for your operation.
The only limit is your imagination.
To Enter an Inventory Item from the Main Menu
1. Click Inventory, click New Item
2. Type in the Inventory Item Name.
If you would like some tips on creating Inventory Names, click here.
3.
Click the ![]() at the end of Groups. The
Groups you created earlier will appear as a popup. Use your mouse
or the scroll bar to find the Group associated with this Inventory Item.
Make sure that the
at the end of Groups. The
Groups you created earlier will appear as a popup. Use your mouse
or the scroll bar to find the Group associated with this Inventory Item.
Make sure that the ![]() is to the left of the Group.
Click Select.
is to the left of the Group.
Click Select.

To create a group, click here.
4.
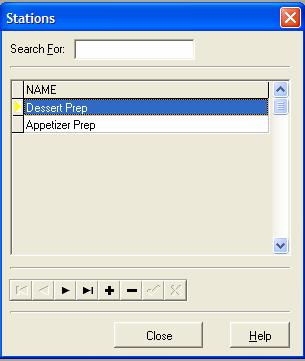
Click the ![]() at the end of Prep Stations.
The Prep Stations you created earlier will appear as a popup. Use
your mouse or the scroll bar to find the Prep Station associated with
this Inventory Item. Make sure that the
at the end of Prep Stations.
The Prep Stations you created earlier will appear as a popup. Use
your mouse or the scroll bar to find the Prep Station associated with
this Inventory Item. Make sure that the ![]() is to
the left of the Prep Station. Click Select.
is to
the left of the Prep Station. Click Select.
Some Inventory Items are used in a Prep Station before they are cooked or served to a customer. You can create Prep Stations that corresponds to different parts of your kitchen. This can help you monitor usage and waste in your establishment. For more information on Prep Stations and how to create them, click here.
5. If it is a saleable Item, check the box.
Saleable Items are Inventory Items that are ready-to-go for the customers. Examples include certain bar items (such as bottled beer and bottles of wine), and other retail items (such as bottled water, wrapped candy bars, bags of chips, concession items, etc.). You can sell a Saleable Items without creating a recipe. For more information on Saleable Items, click here.
6.
Use the cursor, to move to Purchasing Information. Click
the ![]() to show the available Units.
to show the available Units.
This is where you will tell CostGuard how this Inventory Item comes from a Vendor. This is the “big” unit, such as case. Use the information from the Invoice to create the Size/Description. If you want more information on how CostGuard handles units, click here.
7. You will now type in the Cur Cost, the most recent price that you paid for this Inventory Item.
This field may be grayed out. If that happens, it is because you have a count on hand showing Inventory for this item. If you want to change the cost, then you have two choices. First, you can enter in a new count with zero (0) for the quantity. This will affect your reports and you will have to go back afterwards and change the amount again. To do this, click here to go to Counts. The other option is to go to Receipts and change the price. Use a quantity of zero (0) so that your orders are not affected. Save the Receipt. For more information on Receipts, click here.
8.
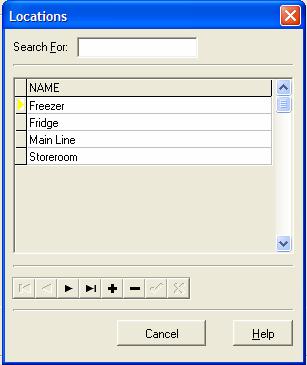
Move your cursor to the blank field below Location. Click
the field, then click the ![]() at the end. The Locations
you created earlier will appear as a popup. Use your mouse or the
scroll bar to find the first Location associated with this Inventory Item.
Make sure that the
at the end. The Locations
you created earlier will appear as a popup. Use your mouse or the
scroll bar to find the first Location associated with this Inventory Item.
Make sure that the ![]() is to the left of the Location.
Click Select.
is to the left of the Location.
Click Select.
Locations are where you keep the Inventory
Item. Later, as you use the Count function, you can print the Inventory
Sheets by Location. To enter in additional Locations, click the
![]() at the bottom of the screen. The Location
popup will appear again. Highlight your next location, and click
Select. Use the
at the bottom of the screen. The Location
popup will appear again. Highlight your next location, and click
Select. Use the ![]() arrows to re-order the Locations,
so that the Location with the most of this Inventory Item is first.
To delete a Location from this screen, make sure that the
arrows to re-order the Locations,
so that the Location with the most of this Inventory Item is first.
To delete a Location from this screen, make sure that the ![]() is to the left of the Location. Click the
is to the left of the Location. Click the ![]() button. If you have not created any Locations
or if you want more information on how to set them up, click
here.
button. If you have not created any Locations
or if you want more information on how to set them up, click
here.
9. Create a Sub-Location. Use the Mouse to move to the Sub-Location Field. Type in up to three characters for the Sub-Location. This is a ‘free form’ field, and is not stored in a list anywhere; you can enter whatever you want.
This further refines the exact physical location of the Inventory Item, such as North Wall of Walk-in Freezer. Since three characters are available for this field, try to be thrifty such as NW for North Wall. This is handy for operations with large storage rooms, or who want certain shelves for specific Inventory Items.
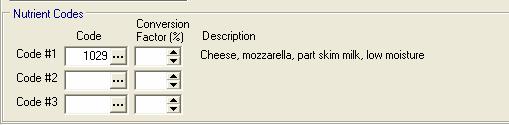
10. If you have the Optional Nutritional Module, and would like to enter the Nutrient Codes for this item, click here.
11. Use the cursor to go back to the Top of the screen. Click on the Units Tab.
You will now move to the Unit Tab, where you will create the Recipe Units for this Inventory Item.
Continue  Quick Tour.
Continue regular path