Tips
If you ring up Free Food or Employee Meals through your POS system, then CostGuard will record the Inventory use when you enter sales.
However, you will need to record other types of adjustments such as spoilage and waste on a regular basis.
CostGuard also a report, which will show actual usage and expected usage so you can quickly find problem areas.
Adjustments reconcile the physical Inventory counts with information from CostGuard and its reports. Adjustments also explain the differences between your Sales Report (from Cash Register or POS) and the Inventory Manager in CostGuard. Adjustments are a very important part of your business – you should know why the numbers do not match up and what happened to missing Inventory Items.
CostGuard subtracts Adjustments from Usage for Reports. This lets you see where you money is going in the kitchen. Without Adjustments, your Food Costs may be artificially high for a period. And, without Adjustments, items that you (and CostGuard) thought were on the shelf, may be gone. Try to enter Adjustments on a regular basis so that CostGuard and your physical inventory match. For more information on the Variance Reports and how CostGuard uses Adjustments, click here.
Some Adjustments are acceptable in this business, examples of are listed below.
Employee Meals: If you give your employees a free meal, or free drinks, this adjustment accounts for food and beverages consumed by them if you do not have a key on your POS to track employee meals. Track these items, and adjust them, so you have a paper trail for your tax return.
“Free Food”: Occasionally, you may give “Free Food” to current or potential customers. Examples include free dessert for a bad meal, Two for One deal where customers purchase one meal and get a second one for free, sampling plates for potential banquet guests, or the free peanuts set out on the bar. This adjustment accounts for the items consumed by customers with no corresponding revenue for the Inventory Items, if you do not track them with a key on the POS.
Some Adjustments are more of an unpleasant fact in this business, but need to be minimized by an owner. Tracking these adjustments will help a manager make some important business decisions.
Waste: This is an adjustment that accounts for Inventory items not used according to a recipe or procedure. An example would be a chef cutting ribeyes into 16 oz steaks instead of 12 oz steaks. When he realizes his mistake, he re-cuts the big steaks into the smaller 12 oz steaks, with 4 oz of meat trim. This 4 oz trim is waste – and unless you use it somehow in the establishment, it will be a waste cost. Other examples include over-trimming produce items, and dispensing too much chemicals in the dishwasher.
You want to track waste to see where and when it is occurring. To prevent waste, you may need to retrain employees, re-write recipes, or change procedures in your kitchen. If you do not adjust CostGuard for waste, then your food cost will be tracking higher over time, and possible affect your yield and order calculations.
Spoilage: This adjustment accounts for food items that spoiled before you could serve them to a customer. You need to track spoilage to prevent it from reoccurring. By tracking it, you can determine if the spoilage is from short-date items from vendors, incorrect receiving practices, or improper storage procedures including temperature control and rotation. Again, employees may need to be retrained, or procedures re-written to prevent spoilage. And, like waste, it needs to be tracked and adjusted so that food cost is not artificially inflated.
CostGuard tracks and enters the Adjustments by name. Before you can create an Adjustment, you must create a name for it. For more information on creating Adjustment Names, click here. If you want to see the current Adjustment names that you have entered into CostGuard, click Inventory, click Reports, and click the button in front of Names. For more information on the Names List, click here.
CostGuard tracks and enters the adjustments in by type. Gather your records and sort by Adjustment type before you start.
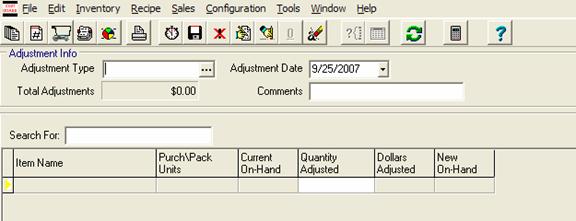
1. Click Inventory, Click Adjustments.
2.
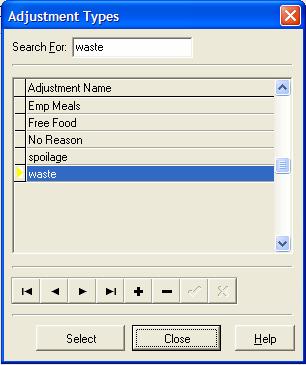
Click the ![]() next to Adjustment Type.
next to Adjustment Type.
3.
Scroll down to highlight the Adjustment desired. Make sure
that the ![]() is to the left of the Adjustment.
Click Select.
is to the left of the Adjustment.
Click Select.
If you need to add adjustment types, click
the ![]() button to bring you to the Adjustment Setup
Screen. For more information on how to setup Adjustments, click here.
button to bring you to the Adjustment Setup
Screen. For more information on how to setup Adjustments, click here.
4.
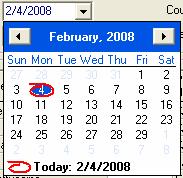
Enter in the date of the adjustment. You can type in the
date or click the ![]() at the end of the date line.
at the end of the date line.
You should enter in the date that the
transaction occurred or that the items were disposed of. You can also
enter in any comments as needed. The date popup will appear. Today’s
date is blue with a red circle around it. If you want today, then
click the circle to enter it. To choose another date in this month,
then move your cursor to that date and click on it. To go to a previous
month, click ![]() button. Keep clicking this button
until you get to the month that you want. Today’s date, or if you highlighted
another date will still be blue in that previous month. Find the
date that you want and click on it. You can use the
button. Keep clicking this button
until you get to the month that you want. Today’s date, or if you highlighted
another date will still be blue in that previous month. Find the
date that you want and click on it. You can use the ![]() to move to months in the future.
to move to months in the future.
Tab
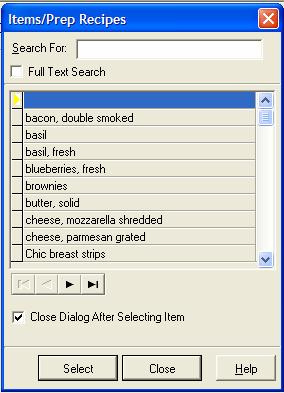
down to the Item Name Field. Click the ![]() button
to bring up a list of Inventory Items. Scroll down or use the Search
field to find the Inventory Item that you want. Make sure that the
button
to bring up a list of Inventory Items. Scroll down or use the Search
field to find the Inventory Item that you want. Make sure that the
![]() is in the square to the left. Click select.
is in the square to the left. Click select.
All of the Inventory Items and Prep Recipes that you entered are on this popup. Use the Search box, scroll bar, or arrows to find the items you want. If you use the Search function, as you type in letters, the cursor will move to the first item that matches the letters. If you need to choose more than one item, unclick the box before “Close Dialog After Selecting Item”. After you choose each item, click Select. When finished choosing all of the items, click Close.
The main Adjustment screen will reappear, notice that the Purch\Pack Unit and the Current On-Hand are showing. Tab over to Quantity Adjusted field column.
Type in the Purch or Pack Unit amount that needs to be adjusted and CostGuard will subtract it from Inventory. Notice that both the Purch\Pack Units are listed. Back when you created each Inventory item, on the Unit Tab, you chose either the Purch Unit or Pack Unit as the default Physical Count Unit. The Default unit will be in all CAPS, while the other unit will be in lower case. Type in the Default Unit first followed by a slash and then the other unit. Looking at the example below, for Mozzarella cheese the Default Unit is CASE while the second unit is bag. If you need to adjust off 3 cases and 2 bags of Mozzarella cheese on the shelf, you would enter 3/2 for the quantity. If you need to adjust only 3 bags of Mozzarella cheese, you would enter 0/3. If you need to adjust 3 cases of Mozzarella cheese, then enter 3 or 3/0 as you prefer. For more information on the Unit Tab, click here.

8.
You can use the Fill command to quickly add Inventory Items.
To use it, click the ![]() icon.
icon.
All Inventory items that you have adjusted in the past with this reason will appear. If you are adjusting the same items on a regular basis, then you need to investigate the situation and stop it. Remember: adjustments are money out of your pocket, and the goal is to minimize them.
If
you add an Inventory Item, and need to delete it, move the ![]() to the left of the item. Click the
to the left of the item. Click the ![]() button to remove it.
button to remove it.
A confirmation popup will appear. Click Yes to remove it from Adjustments, click No to leave it.
If
you are called away while entering in the transactions, click ![]() to suspend the transaction. When you come back,
click Inventory, click Adjustments to have the suspended transaction reappear.
to suspend the transaction. When you come back,
click Inventory, click Adjustments to have the suspended transaction reappear.
To
Print an Adjustment transaction log with today’s activities, click on
the ![]() icon. The Print Preview will appear
on the Screen. Click on the
icon. The Print Preview will appear
on the Screen. Click on the ![]() to send it to the
Printer.
to send it to the
Printer.
Make sure that you print the list before saving, as once an adjustment is saved, it cannot be recalled to the screen. If you need to print it after saving, use the Journal report. For more information on Reports, click here.
When
finished, click the ![]() icon to save the adjustments.
icon to save the adjustments.
Continue regular path