Tips
You can change the three order quantities as needed. If an inventory item becomes a fast mover, change the Re-Order level. If carrying costs of Inventory are becoming too high, change the Par level of some of your slower moving items.
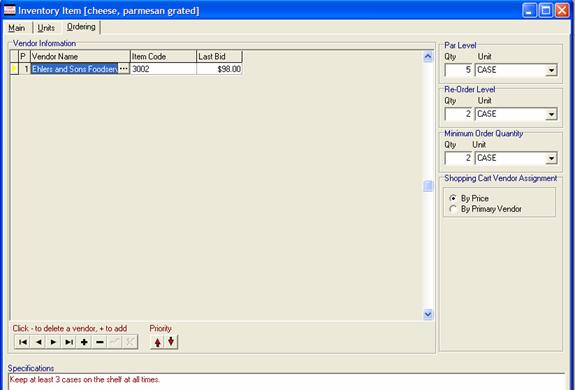
This is where you tell CostGuard who you order the product from, and your ordering patterns. If you have not entered in your Vendor information, click here. You will need the Vendor Information in CostGuard to use this screen. If you do not use the Inventory Module to track counts enter orders, you can skip this screen.
1.
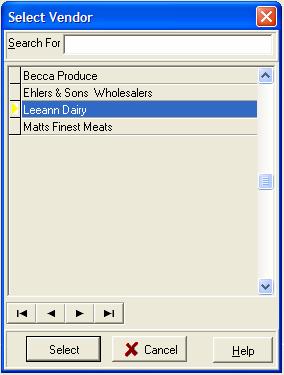
Move your cursor to the Vendor field. Click the ![]() at the end. The Vendors you created earlier will
appear as a popup. Use your mouse or the scroll bar to find the
first Vendor that supplies you with this Inventory Item. Make sure
that the
at the end. The Vendors you created earlier will
appear as a popup. Use your mouse or the scroll bar to find the
first Vendor that supplies you with this Inventory Item. Make sure
that the ![]() is to the left of the Vendor. Click
Select.
is to the left of the Vendor. Click
Select.
To learn how to create Vendors, click here.
2.
To enter additional Vendors for this Inventory Item, click the
![]() at the bottom of the screen.
at the bottom of the screen.
You will see the Vendor popup again. Highlight your next Vendor and click Select.
3. If you have a Prime Vendor for this item, such as a meat purveyor who you use for your meats, make sure they are first.
Use the ![]() arrows to re-order them.
If you order this item by primary vendor, have them first. Put your
“back-up” Vendors after them. If you purchase this Inventory Item
based on Price, then the order of the vendors does not matter.
arrows to re-order them.
If you order this item by primary vendor, have them first. Put your
“back-up” Vendors after them. If you purchase this Inventory Item
based on Price, then the order of the vendors does not matter.
4. Tab over to Item Codes. Type in this Vendor’s Item code for the Inventory Item. You cannot enter in a duplicate code for the same vendor.
5. Tab over to Last Bid. Type in this Vendor’s last bid or invoice price on this item.
Later, you can use the Bid and Receipt screens to update this information automatically. For more information on Bids, click here. For information on entering invoices or Receipts, click here.
6.
To delete a Vendor from this screen, make sure that the ![]() is to the left of the Location. Click the
is to the left of the Location. Click the ![]() button.
button.
7. Use your mouse to move to the optional Specification Field at the bottom of the Screen. Type in any additional information on this Inventory Item.
This field will appear on Bids, Ordering, and Count Sheets. Some suggested comments include “no substitutions” for brand name products, or “must keep 3 cases on shelves at all times”
8. Use your cursor move to the Order level fields on the far right side of the screen. This section tells CostGuard how much of this Inventory Item you need on-hand, and how much you need to order.
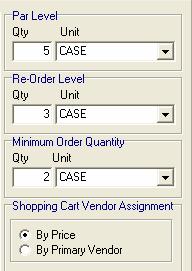
Par Level: This is the level that you want on-hand at any time. It may be called a build level. If an Item is at the Par Level, then CostGuard will not flag it for reordering.
Re-Order Level: This is the minimum amount you want on hand. If Inventory Item is at or below this amount, then it needs to be re-ordered from a vendor. CostGuard will flag Inventory Items at this level in the Ordering Screen.
Minimum Order Quantity: This is the minimum amount of the Inventory Item that you can order from a vendor. Normally, it will be a case, unless vendors break the case of this item. If an item is a fast moving item, such as an ingredient for a house special, then set the Minimum Order Quantity to your weekly order size for that item.
9. To enter the three levels, type in a number for the Qty and click the down arrow at the end of Unit. The Size/Desc and the Pack Unit are listed. Highlight the Unit that you usually order and click it.
10. Next move to Shopping Cart Vendor Assignment. Click the button in front of the option that tells CostGuard who to order from.
Shopping Cart is an automatic order function built into CostGuard. If you want to order this item based on Vendor Bids and Receipts prices, click the button in front of By Price. If you want to order this item only from a certain Vendor, click the button in front of By Primary Vendor. Make sure that this Vendor is the first one listed in the Vendor fields. If you do not actively choose an option, the default will be By Price. Later, when you use the Shopping Cart, CostGuard will assign the Vendors based on what you choose here. For more information on the Shopping Cart, click here.
11. At the bottom of each screen is a series of buttons. If the button is gray, it is not available on that screen.
![]()
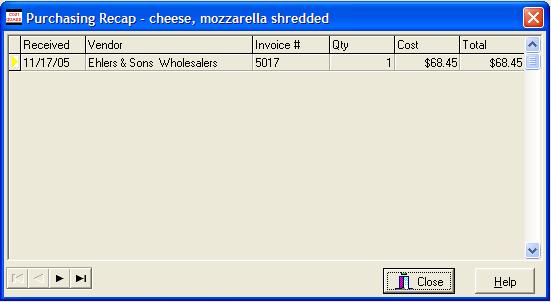
Purchasing Recap: after you have ordered this Inventory item, a popup will appear with an overview of the purchases for this item. It will show the date, number of units purchased, invoice number, unit cost, and total or extension for this item.
Spell: For the Specification field, this will bring up a spell checker.
Sales Setup: If you clicked the Saleable Item box on the main tab, this button lets you access the Sales Menu. You can use it to assign a PLU number for this item. For more information on Saleable items, click here.
Close: this will save the Inventory Item, and close out the screen.
Help: Brings up a context sensitive help screen for this unit.
12.
If you are finished with this Inventory Item, click the ![]() button to save the Inventory Item.
button to save the Inventory Item.
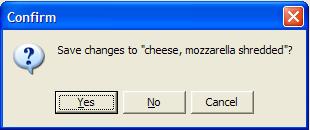
If you click the small x in the corner, a save reminder will appear. Click Yes to Save and Close, click No to exit without saving, and click cancel to return to the screen.
Continue  Quick Tour
Continue regular path
If you would like to return to the Enter a New Inventory Item, and look at another way to enter Inventory items, click here.