Tips
Invoices are full of important information for a restaurant owner. Typically, some details need entering in CostGuard, and other information will go to the Accounting Program. When you use the Receipt function, CostGuard captures the information that it needs for Cost Controls and Inventory Management. When you use the Accounting Interface, it sends the pertinent information to pay the bill, without cluttering up the Accounting program with details of what you purchased.
CostGuard has an optional Accounting Interface that exports invoice data to your bookkeeping program. Using the interface ensures consistent data, avoiding expensive bookkeeping errors. It will also save you time, since you do not have to enter the same information into two different programs.
From an invoice, CostGuard needs the items purchased, number of units purchased, unit cost, and date of delivery. CostGuard uses this information to update your inventory valuation, recipe costing, and margin calculations. Your Accounting program needs the Invoice total, the Vendor, and Super Group information to pay bills. Your Accounting program uses the totals to generate the Income Statement and Statement of Cash Flows. The Accounting Interface exports the Vendor Name, Vendor Number, Invoice Date, Invoice Number, Super Group, Invoice, Tax, and Freight Totals.
The Accounting Interface is an add-on to the original program. This tutorial shows how the Interface works. If you would like to purchase it, visit www.costguard.com for more information, or click Help, Buy Online.
The Accounting Interface has two sections: Setup and Exporting Invoices. You must run the setup program before exporting invoices; however, you can change the settings at any time. Before running the Accounting Interface Setup program, check that you have created SuperGroups in CostGuard. Make sure each SuperGroup has a corresponding GL account number. For more information on creating SuperGroups, click here. Your Accounting program will need the Vendors names and account numbers. For more information on creating Vendors including their Vendor number, click here. Have a copy of your Accounting Program’s documentation handy before starting the Setup.
For Accounting Interface Setup
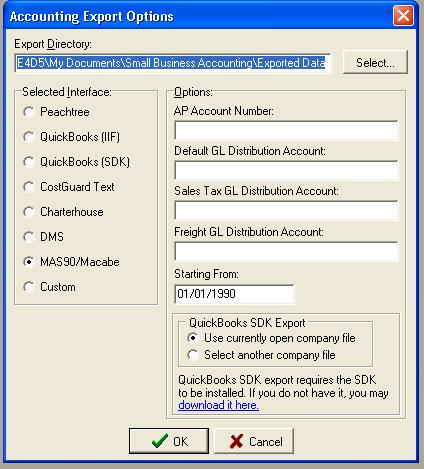
1. Click Configuration, click Accounting Interface Options
2. Click Select to find your Export directory. Your Accounting program uses this directory for importing data.
Check your Accounting Program Import function to find the directory name. By sending the information to proper directory, the Accounting Program can find it quickly. With the exception of QuickBooks SDK format, once you export invoices out of CostGuard, you need to import them into the Accounting Program.
3. Click the button next to the name of your Accounting Program.
If your program is not on the list, double check the Accounting program documentation. Since some Accounting programs emulate others, you may be able to check a similar program for exporting. If the Accounting Program will accept “Text” based imports, click CostGuard Text. For Custom Configurations, contact CostGuard at www.costguard.com for more information on creating a custom file for your program.
4. A special note for QuickBook users, check your documentation from them for the interface type – IIF or SDK export. The SDK is preferred whenever possible.
If you have the version with the SDK Export, click the download here link. You will connect to CostGuard for a SDK export file download. This will install in the QuickBooks database program, allowing CostGuard to write your export file directly to their accounting database. If you need more information on the SDK download, contact QuickBooks at www.QuickBooks.com for more information on how this works. If you have one company, click the “Use currently open company” option. If you have more than one company in your Quickbook files, you may need to click the “Select another company file”. When you are ready to export invoices, you can change it as needed.
5. Under Options, Type in your AP Account Number
Most Accounting Programs track several types of accounts. To make it easy to find the different accounts, most Accounting Programs assign numbers to each one. Vendors are part of the Accounts Payable (AP) files in the Accounting program. Type the AP number here, so your Accounting Program knows where to import the information.
6. Type in the Default GL Distribution Account
Your Accounting program uses Cost Of Goods Sold or a related account type to categorize expenses in the program. CostGuard uses SuperGroups for this function. Tracking expenses and placing them in the correct position on a financial statement such as an Income Statement, or Balance sheet is a key component of any Accounting program. To do this, Accounting programs will number each expense category in the General Ledger (GL). In CostGuard, you mirror this by assigning each SuperGroup the Accounting programs GL number. So, for example, you may have a SuperGroup in CostGuard called “FOOD” that has a corresponding expense account in your Accounting program called “FOOD PURCHASES”. When you export the invoice information from CostGuard to the Accounting Program, the SuperGroups make sure the totals get to the right place. Sometimes, you may have items that are not associated with a SuperGroup. They may be one-time only purchases from a Vendor, which still needs payment for the item. The Default GL Distribution Account number is the corresponding account in the Accounting program where you would enter invoices. Type in the number, so all items ordered are exported to your Accounting program.
7. Type in your Sales Tax GL Distribution Account Number
This is the General Ledger account tracking paid Sales Tax on items you purchase. Type that number in here. Keeping Sales Tax separately in your Accounting program allows for accurate reports in that program. Also, if you operate in an area that credits Sales Tax paid, you will need to keep these totals separate.
8. Type in your Freight GL Distribution Account Number
If your Accounting program is setup to track Freight charges, enter the number here. This helps CostGuard send the freight information to the correct place for reports. If your Vendors do not customarily add a separate freight charge, you can leave this blank.
9. Type in your Start From Date.
If you have just purchased CostGuard, type in the date of the first invoice. If you have been running CostGuard for some time, and just recently purchased this Interface, type in the date of purchase – to avoid exporting old invoices that have cleared your Accounting program.
If you are finished with Setup and would like to export some invoices click here.
To return to Receipts, click here.
To skip to the next section of the Inventory Tutorial, click here.